Efficient Log Splitting
Contents
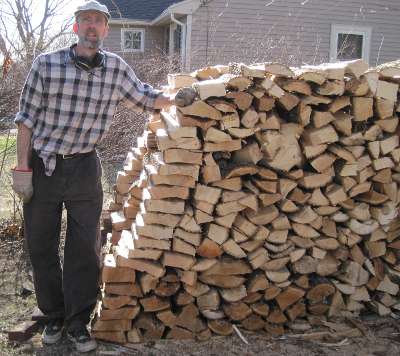
 In 1981 we bought our current house
and I decided that it might be fun to split some logs
and cut the heating bill.
We installed a fireplace insert in the living room,
and I have split about 3 to 3.5 cords of wood a year
since then,
as shown in the picture at right from 1999.
(A 1997
picture
is available to prove that I split more and bigger logs each year!)
Well, I thought I knew how to do it, but it has amazed me
how much I have learned over the past 16 years.
It's actually been a bit of a course in industrial engineering,
or maybe manufacturing engineering.
Read on and you can learn the fine points at tremendous savings
in (human) energy expenditure;
I learned this stuff the hard way.
If you have just a few logs to deal with, skip to the
relevant sections and pick up some pointers.
In 1981 we bought our current house
and I decided that it might be fun to split some logs
and cut the heating bill.
We installed a fireplace insert in the living room,
and I have split about 3 to 3.5 cords of wood a year
since then,
as shown in the picture at right from 1999.
(A 1997
picture
is available to prove that I split more and bigger logs each year!)
Well, I thought I knew how to do it, but it has amazed me
how much I have learned over the past 16 years.
It's actually been a bit of a course in industrial engineering,
or maybe manufacturing engineering.
Read on and you can learn the fine points at tremendous savings
in (human) energy expenditure;
I learned this stuff the hard way.
If you have just a few logs to deal with, skip to the
relevant sections and pick up some pointers.
What I do now is just buy log-length wood from a local tree service;
they get paid to cut them down and then I pay them to deliver
them to me.
True, it does increase carbon dioxide and possibly global warming
but these guys would eventually rot and accomplish the same
thing, just in a few more years.
I don't use much oil, so we gain there.
I keep about six cords in my yard, or two years worth.
We need to age them for a year or so before we burn them,
hence the two-year supply.
The rest of this document is arranged by topic.
If you are thinking of buying a wood stove and heating with wood,
I suggest you read it all.
If your goals are more modest,
just take a look at the sections of interest.
If you are buying wood in longer lengths than 16", you need a chain saw.
If you have any trees with large branches which might fall down
in a storm, you also need a chain saw.
Don't try to economize here; get a good saw with a chain brake,
or you may become a statistic.
I have a Husqvarna Rancher with a 61 cc engine.
I'm not really an expert in the varieties of chain saws,
so look elsewhere for the fine points of buying a saw.
I use a maul to split my logs.
An 8 lb. maul is the tool of choice; the 6 lb. ones just don't quite
do the job.
A wood handle feels good, but at times you hit the handle against
the wood you're splitting so it eventually wears out.
Replacing handles is a pretty exacting task,
and I've never had great success with it.
I bought a maul with a fiberglass handle a couple of years ago, and it's
still going strong.
The fiberglass costs quite a bit more, but it is cheaper over the long run.
What about hydraulic log splitters?
You don't get much exercise there, and I really have no interest in these
beasts.
It's a hobby, remember.
If you love noise and smoke, or want to split more than 4-5 cords a year,
look into it, but don't ask me.
Don't forget ear protection.
If you can use the little foam ear plugs which go right into the
ear canal, you gain 31 dB of protection, and can saw logs all day
with impunity.
Unfortunately, it's hard to take these things in and out, so about
10 years ago I started using the earmuff type,
which cost me 10 dB of noise reduction,
but seemed adequate for my limited splitting.
I could easily take them off and hear my radio when I wasn't sawing.
I more recently still have been using my Audio Technica noise-cancelling
headphones (ATH-ANC7), which give similar noise protection.
Sometimes the chain saw is just too loud for the noise-cancelling
function to work, and it clips!
They work great when I'm splitting, however.
Eye protection is even more important.
I wear glasses with plastic lenses, so I don't bother with it,
but you need safety goggles otherwise.
Occasionally a piece of wood hits me in the glasses,
and I'm glad I'm wearing them.
I keep a couple of pairs of safety goggles around in case one
of the kids wants to take a few cuts with the maul
(the only rule I have is that they aren't allowed to cut off
their leg if they miss the log).
 I used to split logs in the summer, with spring and fall as the fallback
seasons.
That's completely wrong; the best time to split logs is in the winter.
One year I procrastinated and ended up getting logs in November.
That December was extremely cold and I found out how ideal it is to
split logs in the winter.
There are no bugs, you don't get too hot, and most homeowners I know
don't need much extra exercise in the summer anyway.
You don't get cold unless the temp/wind chill is down below about
20ºF.
See the picture at right; I'm wearing just a flannel shirt even though
there is snow on the ground.
Log splitting has a way of keeping you warm.
I used to split logs in the summer, with spring and fall as the fallback
seasons.
That's completely wrong; the best time to split logs is in the winter.
One year I procrastinated and ended up getting logs in November.
That December was extremely cold and I found out how ideal it is to
split logs in the winter.
There are no bugs, you don't get too hot, and most homeowners I know
don't need much extra exercise in the summer anyway.
You don't get cold unless the temp/wind chill is down below about
20ºF.
See the picture at right; I'm wearing just a flannel shirt even though
there is snow on the ground.
Log splitting has a way of keeping you warm.
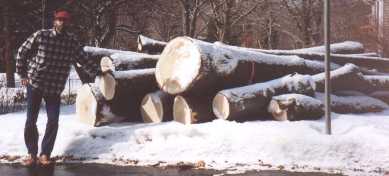
If you get logs delivered late, like I did in the picture from Feb 2001,
they can sit on a foot of hard snow and ice,
which saves your grass from abuse.
If you get them in December, like I often do,
you generally can't benefit from snow cover.
(There are only two cords here; it was a lean year, and fortunately
Katherine was home to refuse a delivery of a couple more in April.
That's just too late in the season to split!)
Ok, you bought a few cords of log-length wood, which is now standing
in your yard. How do you convert that into nice piles of
small, split, stacked wood ready for burning?
Easy, just follow this plan.
First, figure out where you are going to stack your wood,
and lay down a few long sticks of wood to keep your bottom layer
of logs from laying right on the ground.
Figure out how long a log has to be to fit into your stove.
Don't try to cut them exactly this long; go a little shorter.
In my case, I have an old Superheat fireplace insert which can take
big logs in the 18-20" range, but my workhorse Hearthstone Tribute works
best with logs which are 12-14", so I try for the latter.
Be aware that a thin split log of 15" may fit easier than a fat
log of 12", so be careful in measuring.
Next, install your ear protection, and cut a few hundred pounds
of wood off your logs in the appropriate length.
This should take a few minutes,
and should be enough to split and stack in 15 to 30 minutes.
Split the logs right where they fell, using one large one as
a chopping block.
Throw the split logs right into your wheelbarrow (or toboggan
if you have a lot of snow), and when you have a wheelbarrow (toboggan)
full, take it right to your log pile and stack it.
Repeat these steps until you have had enough.
The first weekend, I limit myself to one hour a day,
but after that 2-3 hours is no big problem.
It takes me about 8 hours to cut, split, and stack a cord under normal
circumstances.
That sounds pretty easy, so let me reiterate by telling you what not
to do.
Don't cut your logs into four foot lengths and put them into intermediate
piles; this just makes more work for you later.
Never cut logs and leave them around for a few months without
splitting them.
When they dry out, it's much harder to split them.
(You can get away with leaving them unsplit if the temperature is
below freezing, or only a couple of weeks elapse.)
It's also much easier on your body to do the different tasks
each time rather than just do a couple of hours of straight
splitting, or stacking, or whatever.
I mentioned stacking the logs above but didn't give any details.
Often when you split logs you end up with triangular shaped logs,
little wedges, really.
If you push down on them,
or a bunch of logs above them push on them with their normal weight,
they try to push everything else out of the way and your logpile may
tend to collapse.
The easy way to reduce the likelihood of that is to start the ends
of your pile at a rather gentle slope, but that obviously isn't
a very efficient use of your stacking area.
Here's a technique that I developed over the last few years,
and it has really worked well.
When you are splitting a nice well-behaved log with a standard maul,
you can actually cut it into square blocks, instead of wedges!
Then you start the two ends of each pile with blocks;
you can put all your weight on those guys and they aren't going anywhere!
Warning: you may want to make the logs a little wider, so don't make
them too long or you may have difficulty getting them into the stove.
Take a look at the picture and you'll see how steep I'm piling them now.
My big piles are 3 logs deep, and I put some handy cross-bracing
sticks (couple of inches thick, normally) throughout so it won't fall
down in the other direction!

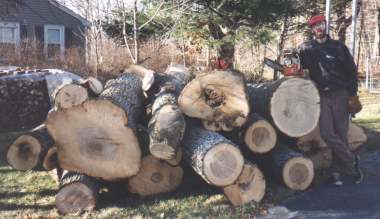
Some people wonder how you split a large log such as the 28"
guy in the picture above with nothing but a maul.
Well, it's normally not a big problem; it's hard to split it
in half, so you take bites around the perimeter and work your way
in to the center.
See the photo.
Well, OK, you say, but what about a branch where a log
splits into two in a Y configuration?
Isn't that harder?
Well, generally it is a little harder, but if you know what to do,
you an usually deal with it if the logs are less than a couple of
feet thick.
The basic idea is to treat the two branches separately on the outside,
cutting off significant chunks of them.
Then you need to split along the axis connecting the center of one
to the center of the other.
Don't even think about hitting perpendicular to this line;
you'll never break even a twig this way.
I guess an animated gif is worth 10,000 words, here.
 In the worst case, you can cut them a little shorter than 15" or
whatever your normal cutting length is.
That makes it easier.
(If you doubt that it's that easy you can view the
split version
of the log in the picture above! It doesn't follow exactly the
red lines, but it does follow the algorithm.)
In the worst case, you can cut them a little shorter than 15" or
whatever your normal cutting length is.
That makes it easier.
(If you doubt that it's that easy you can view the
split version
of the log in the picture above! It doesn't follow exactly the
red lines, but it does follow the algorithm.)
Note that to do the very last split in the amimated gif,
you should start with the smaller end of the log.
In other words, you might need to flip the log over to do that one.
You're hitting the part of the log that was once closer to the ground.
Just make sure you're hitting at the right angle to bisect
the centers of the double branch.
A chain needs to be resharpened periodically.
You can either have an expert do it, or do it yourself.
If you go the expert route, you could buy two chains so
you can use one while one is being sharpened.
If you do it yourself,
you sharpen the cutters with a special circular chain saw file;
make sure you get the right diameter for your chain.
Less often you need to file down the chain guide in front of
the cutter so that your saw takes bites of the correct size.
A handy little tool which has a regular flat file plus a circular
file lets you do both at once if you have a steady hand.
A more complicated gadget clamps on to your saw and forces the
file to the correct angles.
I find that I need to use the latter every so often to make sure
that the angles don't drift away from the correct ones.
The little double file hand tool is a quick way to touch things up.
It also takes care of the chain guide filing.
Your maul also needs to be filed to sharpen it every so often.
This is much easier than doing the chains, and pretty self-explanatory
if you have a good file.
Conventional wisdom has it that you need to age your wood for
at least one year before burning it to get the water content down.
This is over-simplified;
in reality, almost all of the drying out occurs in the summer,
so you really need one period of from say April through October
(in the Northern Hemisphere, that is).
There are certain implications of this fact for your operation.
I have space for up to 7 cords of wood in my yard right now,
two in the front and 5 in the back.
I used to burn them in strictly sequential order,
so I would usually have them aged around two years since I burn
3+ cords per year.
However, it turns out that since I have the logs delivered to my
front yard and split them there, it's less work to stack them there
and bring them in the front door during the winter.
Since I only need them aged one summer,
a couple of years ago I hit on the bright idea of burning my front
2-cord pile every year, and just moving through my back piles
sequentially for the other cord.
Since then, I burn wood from the front which is aged 10-12 months,
and then wood from the back which is aged around 3-4 years.
Both burn well;
the actual type of wood has more to do with how it burns than
the exact aging period (as long as we got that one summer in).
It's a good idea to keep your logs covered.
You can either use some kind of tarp, or 4 mil plastic sheeting.
The plastic gets thin and brittle in the sun after about one year,
but it's fairly cheap.
They do need some air moving through the pile so don't stack them
too tightly or cover the sides;
the sides can get a little wet and it won't hurt.
In my back yard I don't always bother to cover logs (except
the last year before I'm going to burn them) since they age so
long it's not much of a problem, but I'm very careful to keep
the front ones covered.
Page last updated 3 April 2011
Home -
Satellites -
Family -
Religion -
Politics -
Book Reviews -
Software Development